
Intro
Curricular goals of this project:
Demonstrate an understanding of angles, including acute, right, obtuse, straight and reflex, by:
drawing •
replicating and constructing •
bisecting •
solving problems. [C, ME, PS, T, V].
Big idea – varying the transversal allows us to notice angle relationships
Geometry and measurement: spatial relationships can be described, measured and compared.
Use tools to analyse relationships and test conjectures (ruler, compass, protractor)
Visualise to explore and illustrate math concepts and relationships (create a technically correct (angles) compass rose on paper).
Connect math concepts to each other and to other areas and personal interests (create a technically correct, personal and artistic representation of a compass rose)
Reasoning and logic – use the finished compass rose (after providing a magnet) for an orienteering activity.
Using the compass you made in our last project we will be learning and doing some Orienteering.
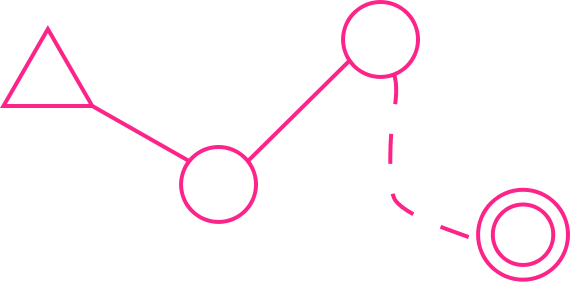
Image source https://commons.wikimedia.org/wiki/File:Orienteering_map_control_points.svg
Pardon? What is Orienteering?
Well, I’m glad you asked.
Orienteering is a group of sports that requires navigational skills using a map and compass to navigate from point to point in diverse and usually unfamiliar terrain, and normally moving at speed. (text source https://en.wikipedia.org/wiki/Orienteering)
There is even an Orienteering association of BC and a Greater Vancouver Orienteering Club.
In fact, Hillary Anderson of the GVOC has done the fieldwork and drawn up a map of Memorial South Park! Can you guess where I’m going with this? Yep, we’re all going Orienteering! Math in Action!!! You, your compass and your understanding of angles.

Image source https://gvoc.whyjustrun.ca
What is Orienteering?
Orienteering is a competitive international sport that combines racing with navigation. It is a timed race in which individual participants use a specially created, highly detailed map to select routes and navigate through diverse and often unfamiliar terrain and visit control points in sequence. Courses also can be enjoyed as a walk in the woods, with difficulty levels from beginner to expert offered at most events.
A standard orienteering course consists of a start, a series of control sites that are marked by circles, connected by lines and numbered in the order they are to be visited, and a finish. The control site circles are centered on the feature that is to be found; this feature is also defined by control descriptions (sometimes called clues, right), a list of which you’ll receive along with your map, or printed on your map. Out in the terrain, a control flag (below) marks the location that the orienteer must visit.
To verify a visit, the orienteer may use a punch hanging next to the flag to mark his or her control card. Different punches make different patterns of holes in the paper. Many clubs now use electronic “punching” instead, using a finger stick with a chip inside it that records your time at each control you visit (one standard electronic control station is depicted below right).
The route between “controls” is not specified, and is entirely up to the orienteer; this element of route choice and the ability to navigate through the forest are the essence of orienteering.
Most orienteering events use staggered starts to ensure that each orienteer has a chance to do his or her own navigating, but there are several other popular formats, including relays, mass-start endurance events, and “Score-O” events in which the orienteer must find as many controls as possible within a specified time (rogaine is an endurance version of score-O).
Originally a training exercise in land navigation for military officers in Scandinavia (See “A brief history,” below), orienteering has developed many variations. Among these, the oldest and the most popular is so-called foot orienteering–this refers to orienteering while running or walking on foot. Typically, when people use the term orienteering, this is what they’re referring to. But now people also orienteer on skis, mountain bikes–even in canoes!
(Text/image source http://www.us.orienteering.org/new-o/what-orienteering)
Things you will need!
Water – bring more if you’ll be running a more advanced course or running in hot weather.Course map and control card from registration
our Compass! (Text and images from http://www.wikihow.com/Orienteer)
Benefits of Orienteering:
It gets people outside and into nature and promotes physical fitness.
It develops the individual’s skills in navigating, problem-solving and Decision making.
Orienteers learn to be self-reliant since most orienteering is individual, and even in the team and mass-start versions, teammates usually practice individually to improve.
Orienteering builds self-esteem; it takes courage to forge ahead by oneself through unknown areas, particularly in the forests that are not familiar to those who live in cities.
(Text source http://www.humankinetics.com/)
Click here for Orienteering Vocabulary

Image source http://www.openorienteering.org/apps/mapper/Schlossbergholz_in_0.5.0.png
ORIENTEERING MAP SYMBOLS
How to use a compass
Using the compass alone
This is a very easy lesson, and I would say, not sufficient for those who would like to travel safely in unfamiliar terrain.
The first thing you need to learn, are the directions. North, South, East and West. Look at the figure and learn how they are. North is the most important.
There are several kinds of compasses, one kind to attach to the map, one kind to attach to your thumb. The thumb-compass is used mostly by orienteers who just want to run fast, and this is the kind of compass I normally use.
But not in this tutorial. I would recommend the third kind of compass. Let’s take a look at it:
You see this red and black arrow? We call it the compass needle. Well, on some compasses it might be red and white for instance, but the point is, the red part of it is always pointing towards the earth’s magnetic north pole. Got that? That’s basically what you need to know. It’s as simple as that.
But if you don’t want to go north, but a different direction? Hang on and I’ll tell you.
You’ve got this turnable thing on your compass. We call it the Compass housing. On the edge of the compass housing, you will probably have a scale. From 0 to 360 or from 0 to 400. Those are the degrees or the azimuth (or you may also call it the bearing in some contexts). And you should have the letters N, S, W and E for North, South, West and East. If you want to go in a direction between two of these, you would combine them. If you would like to go in a direction just between North and West, you simply say: “I would like to go Northwest “.
Let’s use that as an example: You want to go northwest. What you do, is that you find out where on the compass housing northwest is. Then you turn the compass housing so that northwest on the housing comes exactly there where the large direction of travel-arrow meets the housing.
Hold the compass in your hand. And you’ll have to hold it quite flat, so that the compass needle can turn. Then turn yourself, your hand, the entire compass, just make sure the compass housing doesn’t turn, and turn it until the compass needle is aligned with the lines inside the compass housing.
Now, time to be careful!. It is extremely important that the red, north part of the compass needle points at north in the compass housing. If south points at north, you would walk off in the exact opposite direction of what you want! And it’s a very common mistake among beginners. So always take a second look to make sure you did it right!
When you are sure you’ve got it right, walk off in the direction the direction of travel-arrow is pointing. To avoid getting off the course, make sure to look at the compass quite frequently, say every hundred meters at least.
But you shouldn’t stare down on the compass. Once you have the direction, aim on some point in the distance, and go there. But this gets more important when you use a map.There is something you should look for to avoid going in the opposite direction: The Sun. At noon, the sun is roughly in South (or in the north on the southern hemisphere), so if you are heading north and have the sun in your face, it should ring a bell.
When do you need this technique?
If you are out there without a map, and you don’t know where you are, but you know that there is a road, trail, stream, river or something long and big you can’t miss if you go in the right direction. And you know in what direction you must go to get there, at least approximately what direction.
Then all you need to do, is to turn the compass housing, so that the direction you want to go in, is where the direction of travel-arrow meets the housing. And follow the above steps.
But why isn’t this sufficient? It is not very accurate. You are going in the right direction, and you won’t go around in circles, but you’re very lucky if you hit a small spot this way. And that’s why I’m not talking about declination here. And because that is something connected with the use of maps. But if you have a mental image of the map and know what it is, do think about it. But I think you won’t be able to be so accurate so the declination won’t make a difference.If you are taking a long hike in unfamiliar terrain, you should always carry a good map that covers the terrain. Especially if you are leaving the trail. It is in this interaction between the map and a compass, that the compass becomes really valuable. (Text and images source http://www.learn-orienteering.org/old/lesson1.html)

BUT BUT BUT how do you Orienteer you ask…Simple!
On the day we go orienteering you will each receive a Map and a Clue Sheet.
The Map will show all the deferent geographical features on it and the clue sheet will have all the places where you need to go.
The Map
The scales on Hillarys Map is 1:2500. That means that every cm on the map is equal to 250m in the terrain.
Orienteering maps are oriented to magnetic north. North is the top of the page. The north lines run north/south (pssst- look for the big N at the top of the page
The clue sheet for your course will look like this:
WHITE 3.5 km 75 m climb
Start: Corner of the field
1 BL trail junction 2 JC stream junction 3 PG SW corner of the evergreens 4 MP SW end of the knoll 5 BL upper part of the reentrant Finish: NE corner of the building (350 m)
The clues define:
-
 The number of the controls (as shown on the map)
 -
The control code (usually two letters) that will be attached to the flag that is at the correct location
-
A description of the control feature, including (where appropriate) the part of the feature where the flag is hung.
(Text source http://web.williams.edu/Biology/Faculty_Staff/hwilliams/Orienteering/course.html#easyclues)
Here is the Accompanying map:
Image source http://web.williams.edu/Biology/Faculty_Staff/hwilliams/Orienteering/course.html#easyclues
So the Map has a Start(Triangle) and a Finish (double circle)with various other control points between (single circles).
Each group will leave the starting line at staggered intervals. In each control point along the way, you will be asked copy down the control code for each control point. You must copy them down in the correct order.
{do we want to have the codes be clues to another Math activities?}
***When you are done you will submit your clue sheet with the control codes on it to your instructor.***
Notes for Teachers:
Conditions of Map Use All instructors PLEASE read.
Any Greater Vancouver Orienteering Club logo and/or website must NOT be altered or removed from the maps.
The text “Map produced by the Greater Vancouver Orienteering Club ” must NOT be altered or removed from the maps.
The users of any of the maps below waive all responsibility from the GREATER VANCOUVER ORIENTEERING CLUB (GVOC), the ORIENTEERING ASSOCIATION OF BRITISH COLUMBIA (OABC), and their agents from any loss of property or personal injury that may occur during the use of any of these maps.