
It’s term three…
The Sun is hot already above our heads, and its time to give you more control over what, and how, you do your projects. I think most of you are ready.
The following projects and images are from http://telcellservice.com/101-best-photography-projects-to-start-right-now/
PHOTOGRAPH A FAMILY HEIRLOOM
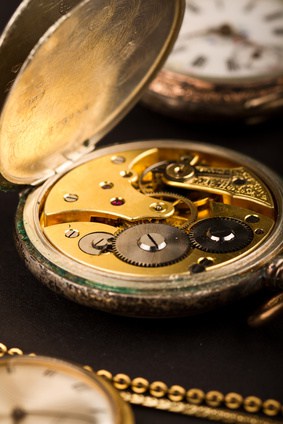
Image source ImprovePhotography.com Visit
FAMILY HEIRLOOM
We can all think of a few things from our childhood with priceless value. Think of that special family heirloom and all the memories that go with it. Think about the stories it would tell, if it could, and photograph that. The moment might be gone, but you can still make a photo that shares the often-retold story about this item. Your story might include a classic car that has traveled through the generations, a family bible that has brought peace, a rocking chair that supported a mother’s embrace, or a piano that endured countless hours of practice. No matter the story, it’s a part of who you are.
Time to Complete Project: ~2 hours
< 1 hour: Select the object. Set up the scene. Do the photo shoot.
1 hour: Pick your favorite photo (or top 3) of the heirloom. Edit. Share with family members and include your memory of this item.
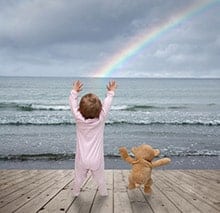
THIS ISN’T A FLOOR PORTRAIT, BUT IT’S A GOOD EXAMPLE OF THE KIND OF CREATIVE PHOTOS YOU CAN MAKE WITH A LITTLE IMAGINATION AND A BABY.
FLOOR PORTRAITS
Now that my boys are 2 and 4 years old, I wish I had better portraits of them as newborns. One awesome way to capture newborn photos that would make for a fun photo project on a rainy day is floor portraits.
Yup! That’s right – stage a scene on the floor with your sleeping child and have a blast while they are too young to care. Newborn portraits can be very traditional and very much alike. By creating the scene, you instantly have something that is unique and interesting. Of course, you can have those traditional photos of your child… but let’s be honest: either we keep it interesting, or we die of boredom.
Be sure to check out Adele Enersen’s blog to see some fantastic examples of floor portraits. And don’t think you have to have a newborn to make floor portraits. It might be even more fun with the older kids.
Time to Complete Project: ~2.5 hours
< 30 min: Set up the scene on the floor with various objects.
~ 1 hour: Photo shoot. Take as many as possible in the hour. Be creative with angles and different objects.
~ 1 hour: Select top 5 photos. Edit. Share online.
MAKE A REAL PORTRAIT OF A LOVED ONE
We all have someone we love and care about. Take the time to make a professional photo of this person and give it to them. However, this photo needs to showcase something about who they are, where they work, or what they are passionate about. This photo needs to tell a story and ultimately introduce your loved one to any stranger who is looking at the photo. You might already have an idea in mind (it could be your fondest memory of this person), but make plans now so that you can make this photo a reality. This will be a photo worth a thousand words, and something they will cherish for years to come.
Time to Complete Project: ~2.5 hours
< 30 min: Arrange schedules (if needed) and discuss idea.
~ 1 hour: Photo shoot. Take as many as possible in the hour (unless you’re having a great time and can’t stop).
~ 1 hour: Going through photos, editing, and sharing.
A-Z PHOTOS
Letters: Go out and find objects that form the shape of each letter of the alphabet. That’s only 26 letters. Sounds easy enough, but you are not allowed to use actual lettering found on signs or buildings (that would be cheating).Doing this project will open your eyes to the world around you. You will look at things differently and contemplate whether or not you could make a photograph out of everything you see. Looking for objects that form the shape of a letter is no easy task, but can be done if your eyes are open. There are two parts to this; you can do both or just choose one to complete the project.
Actions: The goal for this one is to photograph an action that starts with each letter of the alphabet. But here’s the catch: the photograph has to clearly show the action so there is no question about what word is being depicted.
Both: If you’re looking for a big project, photograph the action and the letter to go with it. Arrange the photos together any way you want to create a collage of the alphabet. This could be helpful for school teachers or creating a display for children. Let your imagination take you away on this one.
Time to Complete Project: ~4 hours
< 30 min: Find a location. The best places to consider are those with a lot of architecture and landscaping.
~ 1.5 hours: Photo shoot. To get all the shots you need, you could be there a while. Make a list of what you have photographed so you don’t have to mentally keep track of 26 (or 52 if you’re doing both) images.
~ 2 hour: Rename the photos to match the letter. Edit. Compile. Share online.
SHOOT A SINGLE THEME
A theme might include: color, the same type of flower, classic cars, your hometown, the life of a kid, homeless people, travel photography in a certain location… The list can go on and on. The idea is that your theme is specific but still gives you enough latitude to take interesting photographs.Sometimes it helps to have a theme to keep our mind and interest engaged with our photos. It gives us purpose and a reason to look differently at things that we might have already photographed. Be specific in your theme so that it is obvious that the photo series was taken with particular intent.
TIP: Your photos need to obviously display the theme. For example: You’re doing a theme on the color yellow and you photograph a street sign against a lot of blue sky. Or a yellow dandelion found in the green grass at the park. What color did you intend to photograph? Make sure the focal point is clear to the viewer so your photo is a success.
Time to Complete Project: ~2 hours 10 minutes
< 10 min: Pick your theme and a time you plan on going out with your camera.
~ 1 hour: Photo shoot. Depending on your theme, this might take a little longer or you might have hit the jackpot. Be creative with your photos. Give us a new perspective of something we have probably seen a thousand times.
~ 1 hour: Compile your photos. Try to have at least 10 good photos for your series. Edit. Share.
SHOOT A FILM CAMERA AGAIN
There isn’t much point in practicing with a film camera if you don’t have film or a way to develop it. You can use photo labs that still develop film for you and have them printed, or you can sign up to use a darkroom and develop your own photos. Developing your own photos is truly half the experience of using a film camera. It’s very much like Photoshop where you are in control of how the image turns out. College courses will often provide the resources you need for film photography.If for no other reason, you should try a film camera just for the experience. Many of today’s photographers started in the digital age and don’t know what it is like to achieve a properly exposed photo with a fully manual camera. Film cameras are very affordable these days because they aren’t very popular, but you might also have access to one that you could borrow for a few hours or days.
TIP: Be patient. Working with and developing film is very time consuming and calculated. You’ll want to scream obscenities because it is not digital. But take the time to learn. Go for the experience of learning and understanding more about photography. If nothing else, the experience will teach you to appreciate the camera you have even more.
Time to Complete: ~6 hours
~ 1 hour: Photo shoot. Some film cameras have a light meter built in for your convenience that will make the shoot go pretty well. If not, you will need a light meter to help properly expose your photo.
~ 5 hours: Develop your photos. Assuming you do it yourself, you will need to develop the film in the camera and let it dry. Then you will enlarge your photo using an enlarger (go figure). That process will take a while, and the enlarged photo will need to dry when it’s done.
GO BACK TO MONOCHROME
Black and white photography can be extremely helpful in creating a really strong focal point in the image. There is no color to distract you from what was being photographed.Stunning black and white photos have become something of a lost art. There are a lot of photos we take in color that would look absolutely amazing in black and white. Round up some of your recent photos and turn them black and white to see what you think. Do a black and white photo series where you really focus on going back to the silver lining of photography.
TIP: Do not change your camera settings to shoot in black and white. Instead, convert it after the fact. If you don’t, I guarantee there will come a day when you forget to change that setting back and you find that several of your photos will forever be grayscale. Furthermore, there is editing software that will turn your photos black and white better than your camera could.
Time to Complete: ~1 hour
< 1 hour: Pick out your favorite photos and turn them black and white. Use a Lightroom preset, Photoshop action, or whatever you are most comfortable with.
Light Graffiti/Light Painting.
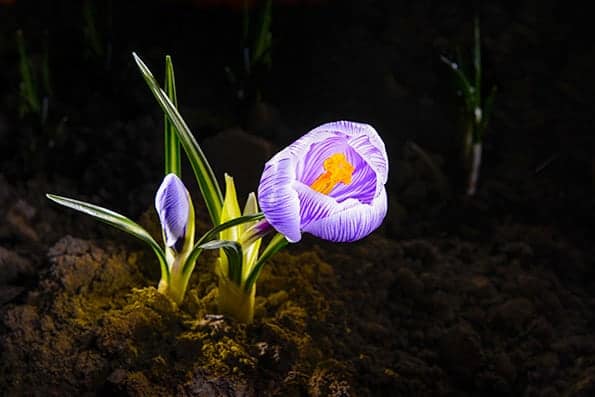
A LIGHT PAINTING OF A FLOWER THAT I DID A FEW MONTHS AGO – JIM HARMER
If you have even the slightest artistic bone in your body, you will fall in love with light painting. Plan at least 2 hours one night to go out and do some night photography with a good flashlight. You will need to use manual mode for this, but you will have complete control over the light and how it shows up in the photo. Because you are experimenting, plan to retake several shots until the light appears exactly as you would like it to. Don’t settle for anything – you’re in control.
If you are looking for something new to do that will jump-start your interest in photography, this is a really good technique for you to try at least twice.
TIP: Don’t be afraid to step in front of the camera. As long as you keep moving and don’t shine the light at the camera or have light on you, then you’re golden. You won’t even appear in the photo.
Time to Complete: ~3.5 hours
< 30 min: Think of a location that doesn’t have a lot of light but would be a good subject. Have a good spotlight with you.
~ 2 hours: This will take a while to photograph. Hopefully excitement makes it hard to stop, but remember that night photography just takes longer.
~ 1 hour: A little editing is usually required for these photos. Export. Share with friends.
GATHER PHOTOGRAPHY PROPS

THE KEY TO BABY PHOTOGRAPHY? PROPS!
Props can make a night and day difference in a photo. Often times when we photograph anything or anyone, we need to tell a story. Props can help tell that story and better express the personality and interests of the person in the photo. Props don’t have to be vintage or wonky to merit having. They could be simple things like footballs, chairs, flowers, different types of clothes, etc.
TIP: The best place to start looking for props is your grandma’s closet. After that, head on over to a local donation center (such as Goodwill or Salvation Army) and see what you can find. Don’t spend a fortune on props!
Time to Complete Project: ~ 3 hours
< 3 hours: This might take a while. See what you can round up in your closets and garages. Then go shopping for different things that you think might work well in a photo. Don’t look for a specific shopping list of items; instead, be open to what you do find and think of ways it could be used.
SHOOT WITH A BUDDY.
There is always a great time to be had when you’re with friends who share the same interest. Plan a time and place to go out with a fellow photographer friend. There are a lot of good things that happen when you go shooting with a friend:
1. They are there to give instant feedback on your photo.
2. They can help with your composition just as much as you can help them with theirs.
3. You inspire each other to get even more creative shots.
4. If you are light painting, then you can help each other take the photo.
5. The buddy system is never a bad thing.
6. Rekindle and strengthen friendships.
7. I think you get the idea…
Time to Complete Project: ~ 2 hours 15 mins
< 15 min: Text your buddy right now and make plans to go for a shoot! You can break the ice by saying, “Hey! We should go photograph [The Golden Gate Bridge] this weekend!”
< 2 hours: You’re with your friend – plan some extra time to be with them and take the photos. Besides, once the creative juices start flowing, it’ll take longer than a normal photo shoot because the two of you will be having a blast together.
Highlights of your life.
Re-create significant moments from your life and shoot them in a series: that time Jimmy Johnso next door gave you a black eye, hiking to a lighthouse with your father, going off to college, getting baptized, etc. Even cooler if you have your kids step in as the actors.
One landscape.
Find one location where you enjoy shooting landscapes, and then visit the location about 10 times over the course of a month. Photograph the same location in different weather conditions, different light, and using your new creative ideas each time you go.
Homelessness.
Thomas Hawk is a photographer who does a $2 homeless photo project. Whenever a poor person asks him for money, he pays them $2 to pose for a photo. Then the person will have earned the money by working for a few minutes while the photographer shoots, and he gets great photos of interesting people. I really hate business cliches, so I’m not sure if I should call this a win-win, or synergy. Either way, it’s a fantastic project.
Fairy tales.
Take classic stories such as Little Red Riding Hood or other folk tales and take photos to illustrate the story.
Geophoto.
Do a project to shoot the geocaching locations around your city. I guarantee you’ll find fantastic new locations. If you’re new to this idea, check out this post where I explained how it works.
Your city’s architecture.
Go shoot the beautiful buildings around your city at all different times of the day. I bet you’ll find some interesting buildings that you’d never noticed before.
Your meals.
Take a picture of one meal a day for a month. Not only is this a convenient way to count calories, you can really learn lighting by learning food photography.
Food fight.
No, I don’t mean throwing food. I mean to let your imagination run a little wild. Imagine little stories with the food in your refrigerator and shoot photos to illustrate the tales.
Downtown fashions.
Do street photography of the most interestingly dressed people in the downtown area of your city. No matter where you live, you’ll find more interesting people than you might expect. Spend several nights downtown and you’re guaranteed to get some fantastic shots.
A day in the life.
Find someone you find interesting and shoot their whole day. Alternatively, you could do a day in the life of a group of people. For example, you could do A Day in the Life of Brigham Young University students. If you were doing this project, you could take pictures all over campus at different hours of one day and show all the interesting things that happen there.
Photojournalism.
I loved working for a short time as a photojournalist. Where will you find the news? If you live in the United States, you can download a free app for your smartphone that gives you access to the police radio channels. That will help to find interesting things! Just make sure you do it legally…
Social Issues.
Find a social issue that is important to you and take photos to highlight the struggle. For example, you could do a photo project about teen obesity, the elderly, immigrant farm workers, etc.